update your password
To save this page to your bookmarks
On a Windows device: Windows key + D
On a Mac: CMD + D
On a mobile device: Look for the star icon

In this section, you will need to select YES or NO to all answers, apart from 4.2 where you will have the option of uploading a copy of your Club Safeguarding policy.
To upload a cop of this policy you need to click on the Red paper icon highlighted.
In the pop-up box that appears, you then need to change the document type to Supporting document instead of Generated by COMET.
You then need to click the Choose button and upload your Clubs Policy by double clicking on it wherever it is saved on your device.
section 5 - club contact information
input your new password
How to renew an existing official registration
A guide on how to reregister someone to your club that has registered with your club previously as an officialFinding the person on COMET
Click on Search Officials
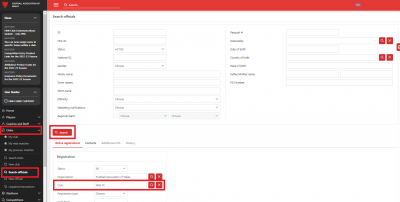
Once you have logged into COMET, click on the Clubs button on the left hand side of your screen to open the drop down menu.
Then select Search Officials.
Once on the Search Officials screen, you will notice your club name in the club box.
All you need to do then is click the Search button highlighted.
This will bring up a full list of people that have ever registered with your club on COMET as a club official.
Find the relevant person and click on their name
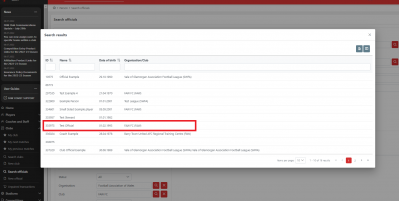
Click on the name to bring up that person's Club Official registration page.
Check all of the persons mandatory details and then Click on New registration
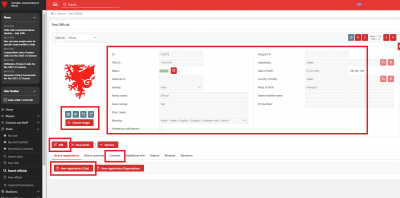
Make sure that all of the mandatory fields are still correct and up to date.
The email address can be found in the contacts tab, and the photo can be edited in the box highlighted next to the person's information.
Click on the Edit button if any of the information does need updating.
Then click on New registration (club) to begin the registration process.
Input the role details and Click on Save
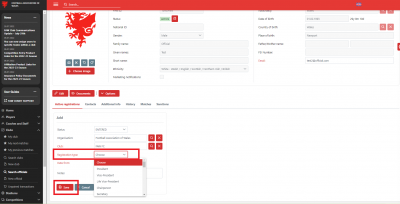
After clicking New registration, you would need to select the role of the person within your club via the Registration Type button and then click the Save button shown.
This will begin the registration process and the request will move to the first stage - ENTERED.
Uploading the registration form
When the registration is at stage ENTERED, it means that you have begun the process and now need to complete the registration.
At this point the person will have received an email containing the form which they can sign digitally to return to you via email.
Please see our user guide on video on how this can be done.
Alternatively they can also print this out to sign and then scan this back via email, or take a photo of the printed and signed form to return to you via mobile or email.
You can also click the Options button and then the Generate registration form button to get a copy of this form if youneeded to print or send via email yourself.
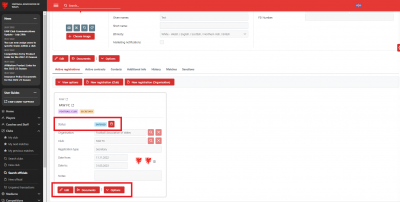
To proceed with the registration you need to click the Documents button highlighted to upload a copy of this signed form onto COMET.
Uploading the signed form
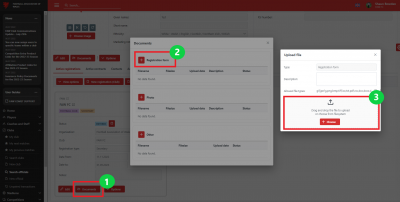
Once you have clicked the Documents button (1), you should be taken onto a pop-up box where you will need to click the Plus button on the Registration form section, as highlighted (2).
Then drag a file into the box or click the Choose button (3) and this will take you onto your Laptop/PC device where you need to go to where the signed form is saved and then double-click on the form to upload it onto COMET.
The form is now uploaded onto COMET
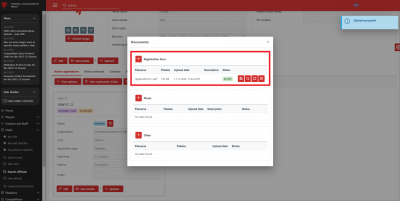
Once you have double-clicked on the document it should immediately appear in the documents box within the Registration form section.
You have now uploaded this document so you can now proceed.
You now need to exit the documents pop-up box by clicking on the white cross in the top right hand corner, and now proceed to complete the registration on the Active registrations tab.
Completing the registration
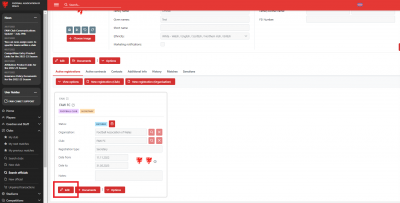
Once back on the Active registrations tab, now click on Edit.
Edit is the button used to carry out actions on a registration request, so click this to proceed.
Click SAVE AS CONFIRMED
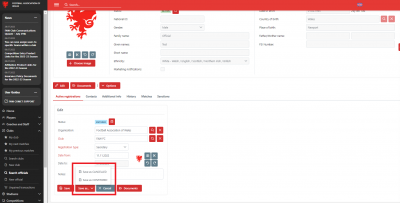
Once you have clicked Edit, you will either be able to Cancel the request by clicking the Save as CANCELLED button, or proceed to confirm the registration by clicking the Save as CONFIRMED button.
Confirm the registration in the pop-up box
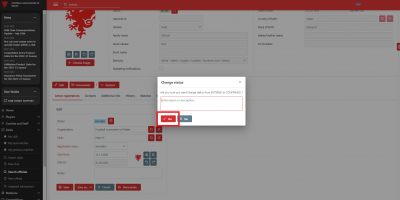
Once you have clicked Save as CONFIRMED, a pop-up box will appear.
To confirm the registration, just click the Yes button in the pop-up box.
The registration has now been completed
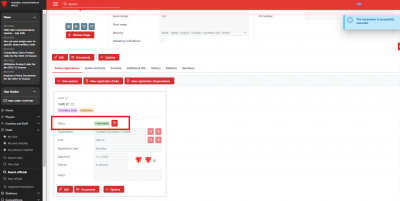
At this point you have done everything you need to and the person is now registered.
The application has moved to the status CONFIRMED and the person will immediately receive a confirmation email containing their registration card and a copy of their personal accident insurance cover when this happens.